Excerpted from Brad’s Sure Guide to SQL Server 2008, which is available as a free eBook.
Previous versions of SQL Server have included a variety of built-in ways to audit activity inside SQL Server. These included:
Login Auditing: Only tracks user login successes and/or failures. Results are sent to the OS Application Log.
SQL Server Profiler (SQL Trace) Audit and Related Events:
Profiler includes over 40 specific audit events, and over 130
additional events that can be traced. Results are stored in trace files.
DDL Triggers: DDL triggers can be added to a database to identify when any DDL event occurs.
C2 Audit Mode: This former auditing standard (now
superseded by Common Criteria Compliance) uses SQL Trace to capture
audit events, which are stored in trace files.
Common Criteria Compliance: A new international auditing standard which also uses SQL Trace to capture data, which are stored in trace files.
None of the above methods offer much granularity, most are not easy
to administer, and with the exception of Login Auditing, they can add a
large amount of overhead to running SQL Server, hurting its performance.
To help overcome these problems, SQL Server 2008 includes a feature
called SQL Server Audit. SQL Server 2008 Enterprise Edition includes all
of the features described in this article, which includes both the SQL
Auditing Foundation and Fine Grained Auditing. SQL Server 2008 Standard
Edition only provides the SQL Auditing Foundation.
Advantages of SQL Server Audit
SQL Server Audit includes these features and benefits:
The Ability to Audit at the Instance and Database Levels:
When you configure an audit, you are given the ability to capture audit
events at the instance-level or the database-level. In most cases, you
will probably want to audit events at both levels.
The Ability to Audit Many Different Activities: SQL
Server Audit includes many predefined activities that you can audit,
including DML and DDL activity. In addition, you can even audit “audit
activities”. In other words, the activities of DBAs, whose job it is to
manage SQL Server Audit, can be monitored by outside parties, if so
desired.
The Ability to Capture and View Audit Results: Audit
results can be captured and stored in disk files, or in the operating
system’s Event Logs. Data on disk can be imported into a database for
further analysis and reporting. Data stored in Event Logs can be viewed
using the Event Log Viewer.
High Granularity: SELECT, INSERT, UPDATE, DELETE,
REFERENCES and EXECUTE statements can be captured for individual users
at the object level, if desired.
Fast and Lightweight: SQL Server Audit uses SQL Server 2008′s
Extended Events engine
to capture audit data. This results in fast performance and minimal
overhead as compared to using SQL Trace to capture activity.
Easy to Setup and Administer: SQL Server Audit can be setup and managed using either SSMS (SQL Server Management Studio) or Transact-SQL.
Limitations of SQL Server Audit
While SQL Server Audit includes many nice features, it also has some drawbacks you need to consider:
While SQL Server Audit takes up less physical resources than SQL
Trace-based auditing options, it still uses SQL Server resources, and
the more detailed your auditing, the more resources that are used.
Because of this, it may not be practical to use SQL Server Audit on very
busy OLTP servers, especially if they are already experiencing hardware
bottlenecks.
SQL Server Audit is instance-based. In other words, there is no easy
way to manage SQL Server Audit on all the SQL Server instances in your
organization from a centralized location, unless you create your own
method using scripts.
Audit data is stored either in a file, or as part of the operating
system’s event logs. If you want to be able to analyze and report on
this data, you will have to manually import it into your own database.
In addition, DBAs will have to manually archive or delete old audit
data.
There is no built-in reporting, other than looking at the events in
the Log Viewer, assuming that is where you store the audit data. For
effective reporting, you will have to create your own reports, most
likely using SQL Server Reporting Services.
How SQL Server Audit Works
When you first begin using SQL Server Audit, you may find it somewhat
unintuitive and a little confusing. In this section, I want to start
with a high-level overview of how it works. In the following section, I
will provide a short demonstration of it in action, so you can better
see how it all fits together. The flow chart shown in Figure 1 should
provide a broad overview of what’s involved in setting up auditing:
 Figure 1: A flow chart showing how to create a new SQL Server Audit
SQL Server Audit allows you to create many different audits, covering most every activity that occurs inside SQL Server.
The first step when creating a new audit is to create a
SQL Server Audit object.
When you create a new SQL Server Audit object, you assign it a name,
select from several configuration options, and you designate a target. A
target is the location where the audit data will be stored. A target
can be a file on disk, the Applications Event Log, or the Security Event
Log. Once you have completed these steps, the new SQL Server Audit
object is saved.
The second step is to create what is called an
Audit Specification. SQL Server Audit offers two different types of Audit Specifications:
1.
Server Audit Specifications - used when you want
to audit an activity that occurs at the SQL Server instance level, such
as auditing login and logout activity.
2.
Database Audit Specifications - used when you want to audit an activity within a database, such as who is SELECTing data from a particular table.
Server and Database Audit Specifications are created differently so
you need to decide which type you need up-front. When creating either
type of Audit Specification, you first assign it a name, and then you
must associate the Audit Specification with the SQL Server Audit object
created in the first step. The rule is that a SQL Server Audit object
can only be associated with one Audit Specification. In other words, you
can’t reuse SQL Server Audit objects when you create Audit
Specifications. And the last step to creating a Server Audit
Specification is to assign it an Audit Action Type. An Audit Action Type
is a predefined activity that occurs in SQL Server that can be audited.
When creating a Database Audit Specification, you assign it a name;
then you associate the Audit Specification with a SQL Server Audit
object; and specify an Audit Action Type, just as you do with a Server
Audit Specification. However, in addition, you must also specify an
Object Class (database, object, or schema), the name of an object to
audit, and the security principal (the user account) that you want to
audit.
Once the Audit Specification is completed, you must then enable both
the SQL Server Audit Object and its associated Audit Specification. At
this point, audit events will begin to be collected in the designated
target.
And last, to view the audit data, you have several choices. If you
store audit data in a file, you can import it into a database for
viewing and reporting. If you store it in one of the two Event Logs, you
can view it using the Event Log Reader.
I have left out a lot of details, but the above illustration and
explanation should give you a fair understanding of how the overall
process works.
A Simple Auditing Example
SQL Server Audit can be configured and managed using either SQL
Server Management Studio (SSMS) or Transact-SQL commands. In this simple
demonstration, we will use SSMS to create a simple audit because it is
easier to understand for DBAs new to SQL Server Audit.
Creating an audit, and reviewing audit results using SSMS, is a four-step process, as outlined in the previous section:
1. Creating the Audit object
2. Creating a Server or Database Audit Specification
3. Starting the Audit
4. Reviewing Audit Events
In the following example, we want to find out who is looking at the
HumanResources.EmployeePayHistory table in the AdventureWorks database.
In other words, we want an audit trail of everybody who runs a SELECT
statement against this table. Obviously, in the real world, your audit
would be more comprehensive, but my goal here is only to provide a
simple yet illustrative demonstration of how auditing works.
Creating the Audit Object
The first step is to create a new audit object. To create a new audit
object using SSMS, go to the SQL Server instance you want to audit,
open up “Security,” and you will see the “Audits” folder, as shown in
Figure 2
:
 Figure 2: Choose “New Audit” to create an audit from within SSMS.
Right-click on the “Audits” folder and select “New Audit,” and the “Create Audit” dialog box appears, a shown in Figure 3
:
 Figure 3: To create an audit, you have to assign it a name and specify where the audit data will reside.
The first thing you need to do is to decide if you want to use the
name that is automatically generated for you as the audit object name,
or to assign your own name. Since numbers don’t mean much to me, I
assigned it my own name.
Next, you have to provide a “Queue Delay” number. This refers to the
amount of time after an audit event has occurred before it is forced to
be processed and written to the log. The default value is 1000
milliseconds, or 1 second. While I am going to accept the default for
this demo, you might want to consider increasing this value if you have a
very busy server.
The next option on the screen is called “Shut down server on audit
log failure”. If you select this option, and later SQL Server is
restarted, and for whatever reason the audit data can’t be logged, then
SQL Server will not start, unless you manually start it at the command
line using a special parameter. This option should only be used in
environments where very tight auditing standards are followed and you
have 24/7 staff available to deal with the problem, should it occur.
Next, beside “Audit,” in the dialog box, there is a drop-down box
with “File” selected by default. This option is used to tell SQL Server
where you want the audit logs to be stored.
 Figure 4: Three are three options where you can store audit data.
SQL Server Audit allows you to store audit data in a file, in the
Security Log, or the Application Log. If you choose “File”, then you
must also specify the location of the file, along with additional
information, such as how much data it can collect, and so on. If you
choose Security Log or Application Log, then the audit results are
stored in these Windows Operating System Event Logs. I am going to
choose “Application Log”. Once this is done, the dialog box should look
as shown in Figure 5:
 Figure 5: Once all the data has been provided, click “OK” to create the audit.
Now that the audit has been configured, click on “OK” to save it. It
should then appear in the SSMS Object Browser, as shown in Figure 6:
 Figure 6: Notice the red arrow next to the newly created audit.
The red arrow next to the audit object means that it is not currently enabled. That’s OK for now, we can enable it later.
Creating a Server or Database Audit Specification
Now that we have created the audit, we need to create the matching
audit specification. If we wanted to do an instance-wide audit, we would
create a server audit specification. But for this example, where the
goal is to audit the SELECT activity on a single table in a single
database, a database audit specification is created.
To create a database audit specification using SSMS, open up the
database to be audited, then open up the security folder under it. Next,
right-click on “Database Audit Specifications” and select “New Database
Audit Specification”, as shown in Figure 7
:
 Figure 7: To create a database audit specification, you must do so from within the database you want to audit.
The “Create Database Audit Specification” dialog box appears, as shown in Figure 8:
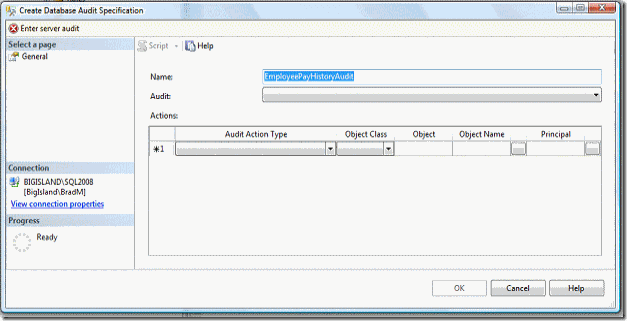 Figure 8: The “Create Database Audit Specification” dialog box has many options to complete.
You can either choose to accept the default name assigned to this
database specification, or you can enter your own. Next, select the
appropriate audit object from the Audit dropdown box, as shown in Figure
9:
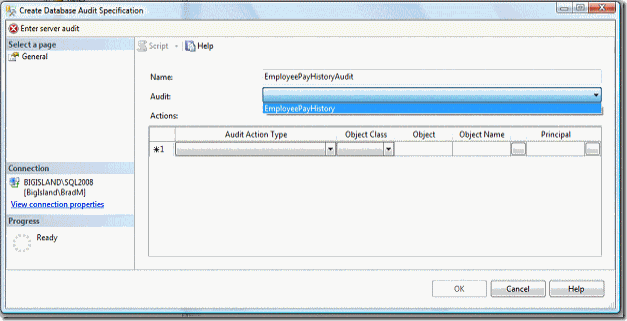 Figure 9: The “Create Database Audit Specification” dialog box has many options to complete.
In this case there is only one audit object, the
“EmployeePayHistory”, as this is a newly installed SQL Server and
doesn’t have any other audit objects on it.
Next, you must specify the kind of audit activity you want to capture
by selecting from the “Audit Action Type” drop-down box, as shown in
Figure 10
:
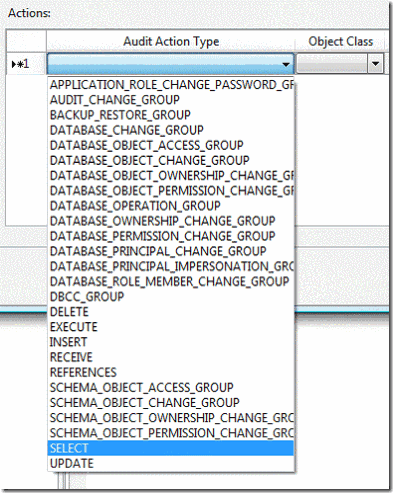 Figure 10: You can select from many pre-defined audit actions.
For this example, I want to choose the “SELECT” “Audit Action Type,”
as the goal is to record all SELECT activity for the payroll table. Of
course, you can choose any audit action type you want, but you can only
choose from those that are listed. You can’t create your own.
Now that the audit action type has been chosen, the “Object Class” must be chosen – see Figure 11
:
 Figure 11: In this case, you can choose from three object classes.
The object class allows us to narrow down the scope of what we want
to audit. For this example, because we want to monitor activity on a
table, “Object” is selected.
The next step is to specify the object, or the table name, that is to
be audited. To do this, click on the browse button under “Object Name,”
and the “Select Objects” dialog box appears, as shown in Figure 12:
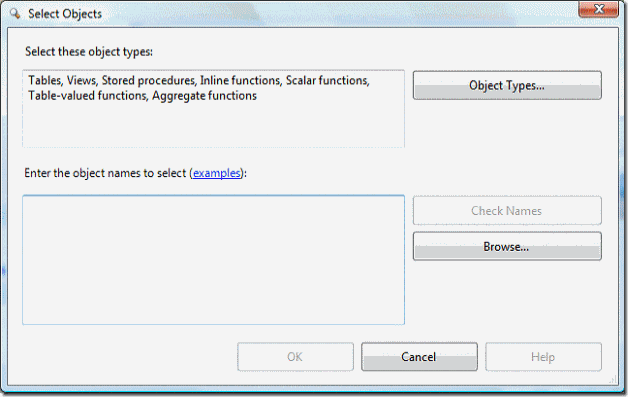 Figure 12: The “Select Objects” dialog box allows you to select which object to audit.
Having clicked on the “Browse” button, the list of available objects will appear, as shown in Figure 13:
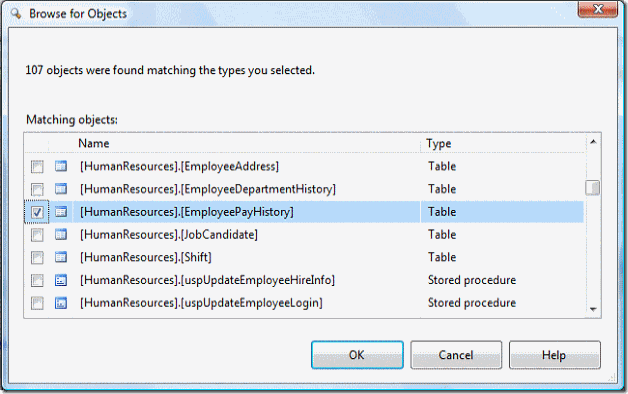 Figure 13: Select the object to be audited from this list.
Browse through the “Browse for Object” dialog box until you find the
object or objects you want to audit, then select them. Above, I have
selected a single table: HumanResources.EmployeePayHistory.
Once the objects have been selected, click “OK,” and the “Select Object” dialog box reappears, as shown in Figure 14:
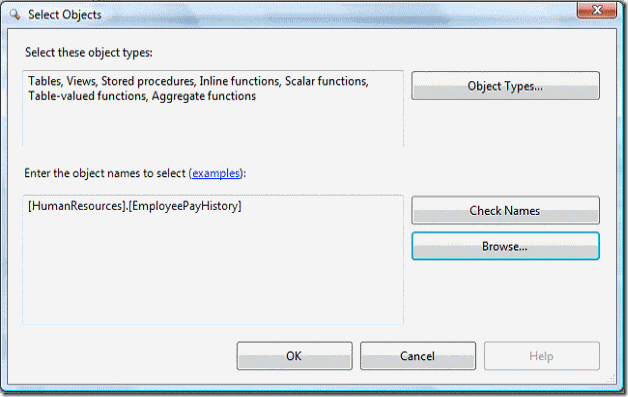 Figure 14: The audited object has been selected.
Now that the object to be audited has been selected, click “OK,” and
you are returned to the original “Create Database Audit Specification”
dialog box, as shown in Figure 15:
 Figure 15: We now see all of our actions up to this point.
There is one last step, and that is to specify what security
principals (user accounts) that we want to monitor. To do this, click on
the browse button under “Principal Name,” and another “Select Object”
dialog box appears.
I am going to spare you seeing this screen again, and skip
immediately to the “Browse for Object” dialog box, where you can see
what principals you can choose from, as shown in Figure 16:
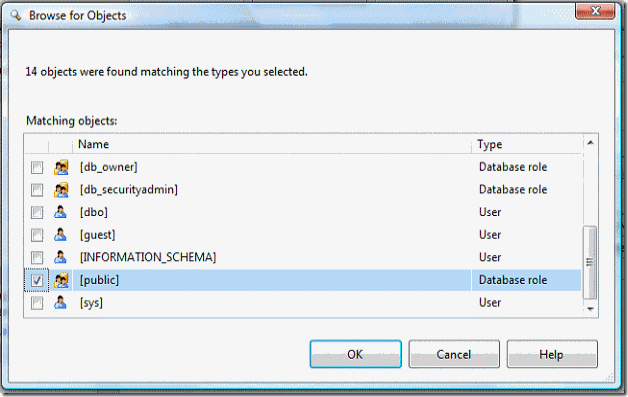 Figure 16: Select the principal you want to audit.
In this case, public is chosen, because the goal of this audit is to identify
anyone who
runs a SELECT against the payroll table. Optionally, you can select on
specific users or roles. Click on “OK” for this dialog box, then click
on “OK” for the “Select Objects” dialog box, and we reach the final
screen, seen on Figure 17:
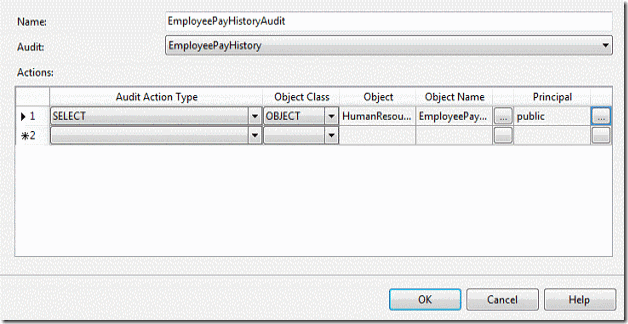 Figure 17: We are finally done creating the database audit specification.
Since we are only interested in auditing this one table for a single
action, we will stop now. If you wanted to, you could continue to add
addition actions and objects to this audit specification. Click on “OK,”
and the database Audit Specification will be saved, and you can view it
in object explorer, as shown in Figure 18:
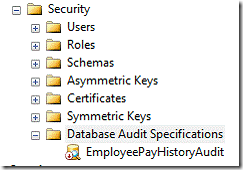 Figure 18: Notice the red arrow next to the specification, which tells us that it is turned off.
Once the new database audit specification has been created, it has a
red arrow next to it, indicating that it is turned off. We will turn it
on in the next step.
Starting the Audit
I have saved the steps of starting the audit till last because I
wanted to show you that when you create an audit object, and a database
audit specification, that they are turned off by default, and both must
be turned on before audit data is collected.
First, turn on the audit object, which in our case is called
“EmployeePayHistory,” then turn on the database audit specification,
which in our case is called “EmployeePayHistoryAudit.” To turn these on,
right-click on them, one at a time, and select “Enable Audit.” Auditing
has now begun. At this point, any SELECT statements run against the
HumanResources.EmployeePayHistory table are recorded and stored in the
Application Events log file.
Reviewing Audit Events
Now, let’s see what all this work has done for us. To find out, open
up the “Application Log File Viewer” and take a look. In this example,
you’ll see something similar to Figure 19:
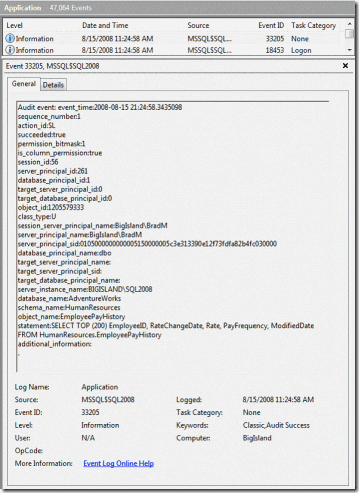 Figure 19: When you click on an audit event, this is the detail information you see.
Because the log is large and hard to easily fit on a screen, I have
scrolled to one of the many events in the Application Log (there a lot
more you can’t see) and clicked on it. As you can see in figure 19, the
details of the event provide a lot of information about a SELECT
statement that ran against the audited table. Because of the potentially
large quantity of information you can get back when using SQL Server
Audit, I would suggest you store audit data to file, import this data
into a SQL Server database, and then use Transact-SQL or Reporting
Services to analyze the data. Using the Event Viewer to review audit
data, as I have done here, is not very efficient.
Summary
While this seemed like a lot to cover, it is just small sample of how
the SQL Server Audit feature of SQL Server 2008 works. SQL Server Audit
is a powerful new tool that allows DBAs to collect almost any activity
that occurs within our servers.
Overall, I would suggest that if you have been looking for a SQL
Server auditing system, and have been considering purchasing a
third-party auditing application, or creating your own, you will want to
first carefully evaluate SQL Server Audit to see if it can meet your
SQL Server auditing needs.


