Tuesday 7 November 2017

Unsupported Customization


Modifications to Dynamics 365 that are made without using either the methods described in this documentation or Dynamics 365 tools are not supported and are not preserved during updates or upgrades of Dynamics 365. Anything that is not documented in this documentation and supporting documents is not supported. Additionally, unsupported modifications could cause problems when you update through the addition of hotfixes or service packs or upgrade Dynamics 365. To minimize update and upgrade issues, do not modify any Dynamics 365 file that you did not create yourself.
The following is a list of unsupported action types that are frequently asked about:
  • Modifications to any .aspx, .css, .htm, .js, .xml, .jpg, or .gif files or the addition of files in the wwwroot directories of the Dynamics 365 application, Dynamics 365 tools, or Dynamics 365 files located at Program Files\Dynamics 365. However, if you have made changes to these files, these files are checked for modifications and will not be overwritten.
  • Modifications to the Dynamics 365 website (file and website settings). Custom applications should be installed in a different website. This includes modifications to the file system access control lists (ACLs) of any files on the Dynamics 365 server.
  • Use of client certificates is not supported. If you configure the Dynamics 365 website to require IIS client certificates, you will get authentication failures for any applications that were built using the SDK.
  • Modifications to the physical schema of the database, other than adding or updating indexes. This includes any actions performed against the database without using the System Customization capabilities in the web application or using the metadata APIs that are described in this SDK documentation. Modifying tables, stored procedures, or views in the database is not supported. Adding tables, stored procedures, or views to the database is also not supported because of referential integrity or upgrade issues. For Dynamics 365 (online) on-premises deployments, adding indexes is supported per the guidelines in the Deploying and administering Microsoft Dynamics 365 (on-premises)documentation. This applies to all Dynamics 365 databases and the Dynamics 365 for Outlook local database.
    Important
    When you change the database without using the support methods for system customization, you run the risk of problems occurring during updates and upgrades.
  • Data (record) changes in the Dynamics 365 database using SQL commands or any technology other than those described in this documentation.
  • Referencing any Dynamics 365 dynamic-link libraries (DLLs) other than the following:
    • Microsoft.Xrm.Sdk.dll
    • Microsoft.Crm.Sdk.Proxy.dll
    • Microsoft.Xrm.Sdk.Workflow.dll
    • Microsoft.Xrm.Sdk.Deployment.dll
    • Microsoft.Crm.Outlook.Sdk.dll
    • Microsoft.Xrm.Sdk.Data.dll
  • The use of application programming interfaces (APIs) other than the documented APIs in the web services: Web API, Organization Service, Deployment Service, Discovery Service, Organization Data Service.
  • To achieve the appearance and behavior of Dynamics 365, the reuse of any Dynamics 365 user interface controls, including the grid controls. These controls may change or be overwritten during an upgrade. We do not recommend that you use or change the Default.css file in the Dynamics 365 root installation folder.
  • The reuse of any Dynamics 365 JavaScript code, including ribbon commands. This code may change or be overwritten during an upgrade.
  • Modifications to any one of the Dynamics 365 forms or adding new forms, such as custom .aspx pages, directly to Office Outlook or making changes to .pst files. These changes will not be upgraded.
  • Making customizations except when you use the Dynamics 365 supported tools available offline in the Dynamics 365 for Outlook.
  • The use of custom HttpModules to inject HTML/DHTML into the Dynamics 365 Forms.
  • Creating a plug-in assembly for a standard Dynamics 365 assembly (Microsoft.Crm.*.dll) or performing an update or delete of a platform created pluginassembly is not supported.
  • Creating an Internet Information Services (IIS) application inside the Dynamics 365 website for any VDir and specifically within the ISV folder is not supported. The <crmwebroot>\ISV folder is no longer supported.
  • Editing a solutions file to edit any solution components other than ribbons, forms, SiteMap, or saved queries is not supported. For more information, see Support for Editing the Customization File. Defining new solution components by editing the solutions file is not supported. Editing web resource files exported with a solution is not supported. Except for the steps documented in Maintain Managed Solutions, editing the contents of a managed solution is not supported.
  • Silverlight Application Library Caching is not supported.
  • Displaying an entity form within an IFrame embedded in another entity form is not supported.
  • Plugin and Workflow Assemblies must contain all the necessary logic within the respective dll. Plugins may reference some core .Net assemblies. However, we do not support dependencies on .Net assemblies that interact with low-level Windows APIs, such as the graphics design interface. Previously, Dynamics 365 allowed for assemblies to refer to these interfaces, but to adhere to our security standards, changes to this behavior are required.

Tuesday 25 October 2016

Importing CRM solution - Workflow owner

 I am importing a solution that contains processes and it fails with this error message “The workflow cannot be published or unpublished by someone who is not its owner”. What is wrong?

If your solution contains a process that already exists in the organization and is activated then solution import will attempt to update it. In order to do so, it must first deactivate it. However, if the owner of the activated process is not the same as the user who is importing the solution, then deactivating the process will fail. Therefore you have a few options to fix this problem:

1.       Import the solution using the user who owns the activated process. This can be tricky, especially if there are multiple processes owned by different users which need to be updated by the solution import.

2.       Verify which processes are included in the solution, and then find them in the organization, if you can find them and they are not owned by you then you must assign them to yourself. You can reassign them to the original user after you import the solution; however, you will have to ask the process owners to activate it themselves.


Why can’t I activate/deactivate someone else’s workflow, even if I am the system administrator?

For the same security reason as explained above. You want the workflow owner to explicitly acknowledge that a workflow will be activated and will perform some actions on his behalf. You would not want to allow another user (even the system administrator) to decide that some process should be executed on another user’s behalf. If you want to activate/deactivate someone else’s process you must first assign it to yourself.

Monday 21 September 2015

Default Status And Status Reason Values


Status reason transitions are an optional additional level of filtering to define what the status reason value can be changed to for each status reason.
Entities that can have different status values have two fields that capture this data:
Display Name Description
Status Represents the state of the record. Typically Active or Inactive. You cannot add new status options.
Status Reason Represents a reason that is linked to a specific status. Each status must have at least one possible status reason. You can add additional status reason options.
Activity entity
State Status Reason
0 : Open 1 : Open
1 : Completed 2 : Completed
2 : Canceled 3 : Canceled
3 : Scheduled 4 : Scheduled
Appointment entity
State Status Reason
0 : Open 1 : Free
2 : Tentative
1 : Completed 3 : Completed
2 : Canceled 4 : Canceled
3 : Scheduled 5 : Busy
6 : Out of Office
Article entity
State Status Reason
1 : Draft 1 : Draft
2 : Unapproved 2 : Unapproved
3 : Published 3 : Published
Authorization Server entity
State Status Reason
0 : Active 1 : Enabled
1 : Inactive 2 : Disabled
Bulk Delete Operation entity
State Status Reason
0 : Ready 0 : Waiting For Resources
1 : Suspended 10 : Waiting
11 : Retrying
12 : Paused
2 : Locked 20 : In Progress
21 : Pausing
22 : Canceling
3 : Completed 30 : Succeeded
31 : Failed
32 : Canceled
Campaign entity
State Status Reason
0 : Active 0 : Proposed
1 : Ready To Launch
2 : Launched
3 : Completed
4 : Canceled
5 : Suspended
1 : Inactive 6 : Inactive
Campaign Activity entity
State Status Reason
0 : Open 1 : Proposed
0 : In Progress
4 : Pending
5 : System Aborted
6 : Completed
1 : Closed 2 : Closed
2 : Canceled 3 : Canceled
Campaign Response entity
State Status Reason
0 : Open 1 : Open
1 : Closed 2 : Closed
2 : Canceled 3 : Canceled
Case entity
State Status Reason
0 : Active 1 : In Progress
2 : On Hold
3 : Waiting for Details
4 : Researching
1 : Resolved 5 : Problem Solved
1000 : Information Provided
2 : Canceled 6 : Canceled
2000 : Merged
Case Resolution entity
State Status Reason
0 : Open 1 : Open
1 : Completed 2 : Closed
2 : Canceled 3 : Canceled
Column Mapping entity
State Status Reason
0 : Active 1 : Active
Contract entity
State Status Reason
0 : Draft 1 : Draft
1 : Invoiced 2 : Invoiced
2 : Active 3 : Active
3 : On Hold 4 : On Hold
4 : Canceled 5 : Canceled
5 : Expired 6 : Expired
Contract Line entity
State Status Reason
0 : Existing 1 : New
1 : Renewed 2 : Renewed
2 : Canceled 3 : Canceled
3 : Expired 4 : Expired
Data Import entity
State Status Reason
0 : Active 0 : Submitted
1 : Parsing
2 : Transforming
3 : Importing
4 : Completed
5 : Failed
Discount List entity
State Status Reason
0 : Active 100001 : Active
1 : Inactive 100002 : Inactive
Duplicate Detection Rule entity
State Status Reason
0 : Inactive 0 : Unpublished
1 : Publishing
1 : Active 2 : Published
Email entity
State Status Reason
0 : Open 1 : Draft
8 : Failed
1 : Completed 2 : Completed
3 : Sent
4 : Received
6 : Pending Send
7 : Sending
2 : Canceled 5 : Canceled
Fax entity
State Status Reason
0 : Open 1 : Open
1 : Completed 2 : Completed
3 : Sent
4 : Received
2 : Canceled 5 : Canceled
Goal entity
State Status Reason
0 : Active 0 : Open
1 : Inactive 1 : Closed
2 : Discarded
Goal Metric entity
State Status Reason
0 : Active 0 : Open
1 : Inactive 1 : Closed
Import Data entity
State Status Reason
0 : Active 0 : Active
Import Entity Mapping entity
State Status Reason
0 : Active 1 : Active
Import Log entity
State Status Reason
0 : Active 0 : Active
Import Source File entity
State Status Reason
0 : Active 0 : Submitted
1 : Parsing
2 : Transforming
3 : Importing
4 : Completed
5 : Failed
Invoice entity
State Status Reason
0 : Active 1 : New
2 : Partially Shipped
4 : Billed
5 : Booked (applies to services)
6 : Installed (applies to services)
1 : Closed (deprecated) 3 : Canceled (deprecated)
7 : Paid in Full (deprecated)
2 : Paid 100001 : Complete
100002 : Partial
3 : Canceled 100003 : Canceled
Lead entity
State Status Reason
0 : Open 1 : New
2 : Contacted
1 : Qualified 3 : Qualified
2 : Disqualified 4 : Lost
5 : Cannot Contact
6 : No Longer Interested
7 : Canceled
Letter entity
State Status Reason
0 : Open 1 : Open
2 : Draft
1 : Completed 3 : Received
4 : Sent
2 : Canceled 5 : Canceled
List Value Mapping entity
State Status Reason
0 : Active 0 : Active
Lookup Mapping entity
State Status Reason
0 : Active 0 : Active
Marketing List entity
State Status Reason
0 : Active 0 : Active
1 : Inactive 1 : Inactive
Opportunity entity
State Status Reason
0 : Open 1 : In Progress
2 : On Hold
1 : Won 3 : Won
2 : Lost 4 : Canceled
5 : Out-Sold
Opportunity Close entity
State Status Reason
0 : Open 1 : Open
1 : Completed 2 : Completed
2 : Canceled 3 : Canceled
Order entity
State Status Reason
0 : Active 1 : New
2 : Pending
1 : Submitted 3 : In Progress
2 : Canceled 4 : No Money
3 : Fulfilled 100001 : Complete
100002 : Partial
4 : Invoiced 100003 : Invoiced
Order Close entity
State Status Reason
0 : Open 1 : Open
1 : Completed 2 : Completed
2 : Canceled 3 : Canceled
Owner Mapping entity
State Status Reason
0 : Active 0 : Active
Partner Application entity
State Status Reason
0 : Active 1 : Enabled
1 : Inactive 2 : Disabled
Phone Call entity
State Status Reason
0 : Open 1 : Open
1 : Completed 2 : Made
4 : Received
2 : Canceled 3 : Canceled
Price List entity
State Status Reason
0 : Active 100001 : Active
1 : Inactive 100002 : Inactive
Process entity
State Status Reason
0 : Draft 1 : Draft
1 : Activated 2 : Activated
Process Session entity
State Status Reason
0 : Incomplete 1 : Not Started
2 : In Progress
3 : Paused
1 : Complete 4 : Completed
5 : Canceled
6 : Failed
Queue entity
State Status Reason
0 : Active 1 : Active
1 : Inactive 2 : Inactive
Queue Item entity
State Status Reason
0 : Active 1 : Active
1 : Inactive 2 : Inactive
Quick Campaign entity
State Status Reason
0 : Open 1 : Pending
2 : In Progress
1 : Closed 3 : Aborted
4 : Completed
2 : Canceled 5 : Canceled
Quote entity
State Status Reason
0 : Draft 1 : In Progress
1 : Active 2 : In Progress
3 : Open
2 : Won 4 : Won
3 : Closed 5 : Lost
6 : Canceled
7 : Revised
Quote Close entity
State Status Reason
0 : Open 1 : Open
1 : Completed 2 : Completed
2 : Canceled 3 : Canceled
Recurring Appointment entity
State Status Reason
0 : Open 1 : Free
2 : Tentative
1 : Completed 3 : Completed
2 : Canceled 4 : Canceled
3 : Scheduled 5 : Busy
6 : Out of Office
Rollup Query entity
State Status Reason
0 : Active 0 : Open
1 : Inactive 1 : Closed
Saved View entity
State Status Reason
0 : Active 1 : Active
3 : All
1 : Inactive 2 : Inactive
Sdk Message Processing Step entity
State Status Reason
0 : Enabled 1 : Enabled
1 : Disabled 2 : Disabled
Service Activity entity
State Status Reason
0 : Open 1 : Requested
2 : Tentative
1 : Closed 8 : Completed
2 : Canceled 9 : Canceled
10 : No Show
3 : Scheduled 3 : Pending
4 : Reserved
6 : In Progress
7 : Arrived
System Job entity
State Status Reason
0 : Ready 0 : Waiting For Resources
1 : Suspended 10 : Waiting
2 : Locked 20 : In Progress
21 : Pausing
22 : Canceling
3 : Completed 30 : Succeeded
31 : Failed
32 : Canceled
Task entity
State Status Reason
0 : Open 2 : Not Started
3 : In Progress
4 : Waiting on someone else
7 : Deferred
1 : Completed 5 : Completed
2 : Canceled 6 : Canceled
Transformation Mapping entity
State Status Reason
0 : Active 0 : Active

Tuesday 1 September 2015

CRM 2013 Adding an On Change Event to a Grid View

 
How to add an on change event to a grid view, similar to an on load or save event, which will allow a developer to add some code to the page??

Capture

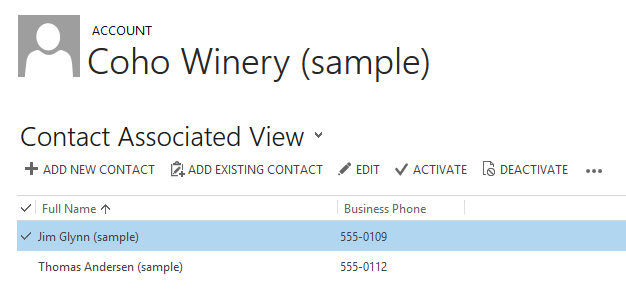
Take the contact associated view shown on the account (in the image above), imagine we wish to add JavaScript so that whenever the user clicks an option we get a chance to run some code. We don’t want to make the user click a button, we just need to chance to run some logic and show a message. If this was a form we could add an on change event, however this is a view and MSCRM doesn’t provide that kind of hook.
So we need to get a little more creative:
  1. Add a new ribbon button to the sub grid with a command (in CRM 2013 buttons without commands are hidden).
  2. Add an enable rule so the button is always disabled (in CRM 2013 disabled buttons are automatically hidden).
  3. Add a JavaScript library to that enable rule – this is where we can place our custom code.
  4. When the user makes a selection in the view, MSCRM automatically refreshes the ribbon (command bar), and re-evaluates the enable rules – effectively we have an on change event.
My ribbon editor of choice is Ribbon Workbench from Scott Durrow.
Building the Solution
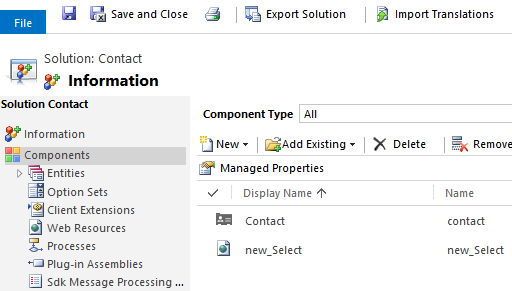
Create a new solution (or reuse an old one, it doesn’t matter), include in that solution the entity which is shown in the associated view. In my case that is the contact. Into that solution also add a JavaScript library (new_select in my case).CaptureAdd the JavaScript
Into your JavaScript library add the following code, this will print the IDs of the records that are selected in associated view and will serve as the base for your developments.
1
2
3
4
5
6
7
8
function OnClick(input) {
//This is where you can put your custom code
//For the purposes of demonstration I'm just going to print the selected IDs
alert(input);
//Return false so the button is always disabled and in CRM 2013 automatically hidden.
return false;
}
Adding the Button
Time to fire up Ribbon Workbench and add the button.
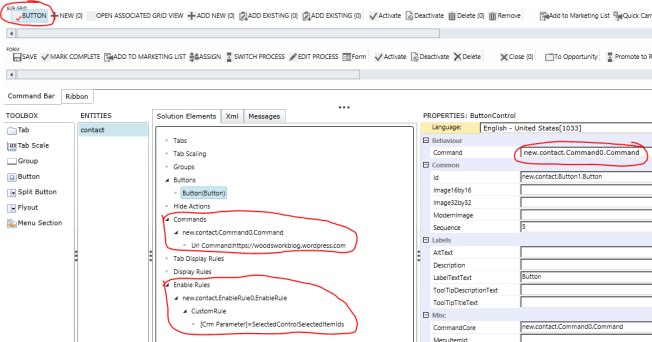
  1. Add a new button within the SUB GRID section (also the associated view section).
  2. Add a new command, set the command to be the command for the new button.
  3. Add a URL action to the command which navigates to your favorite website – the user will never be able to click this button and open the link, but we need to add an action to the button otherwise CRM wont display it.
  4. Add a new enable rule to the command:
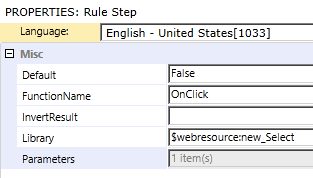
  • Default: False – this will mean the button is always disabled and in CRM 2013 this means it is always hidden. This will be used if you didn’t provide a return value in your script.
  • Function Name: OnClick – this should match whatever you have defined in your JavaScript.
  • Library: $webresource:new_Select – this should match your library name, if you use the lookup control in Ribbon Workbench its fairly easy to select the correct file.
  • Parameters: SelectedControlSelectedItemIds – this will mean CRM will pass the function the ID of every selected ribbon in the grid view.
Capture
Capture
Test
Publish your changes and return to your parent entity (account in my case) and then start clicking grid records, and you should get something similar to the following.
Capture
Note for CRM 2011: I believe the steps described above will still work, but you will end up with a disabled button sat on the ribbon. You could try adding a visibility rule to hide the button, but I don’t think CRM bothers to evaluate the enable rules of a hidden button so your custom code wont be called. So you could try piggy backing the enable rule on another existing button, but the rule should always returns true so the button is always visible.
Note for CRM 2013 & sub grids on the form: Sub grids embedded on the form in CRM 2013 don’t get the ribbon (command) bar, so these steps wont work there. I suggest removing any sub grids and just using the associated views if you really need this type of behavior.

Thursday 19 February 2015

CRM Javascript Functions

1.  Get the GUID value of a lookup field:
Note: this example reads and pops the GUID of the primary contact on the Account form
1
2
3
4
function AlertGUID() {
    var primaryContactGUID = Xrm.Page.data.entity.attributes.get("primarycontactid").getValue()[0].id;
    alert(primaryContactGUID);
}
2.  Get the Text value of a lookup field:
Note: this example reads and pops the name of the primary contact on the Account form
1
2
3
4
function AlertText() {
    var primaryContactName = Xrm.Page.data.entity.attributes.get("primarycontactid").getValue()[0].name;
    alert(primaryContactName);
}
3.  Get the value of a text field:
Note: this example reads and pops the value of the Main Phone (telephone1) field on the Account form
1
2
3
4
function AlertTextField() {
    var MainPhone = Xrm.Page.data.entity.attributes.get("telephone1").getValue();
    alert(MainPhone);
}
4.  Get the database value of an Option Set field:
Note: this example reads and pops the value of the Address Type (address1_addresstypecode) field on the Account form
1
2
3
4
5
6
function AlertOptionSetDatabaseValue() {
    var AddressTypeDBValue = Xrm.Page.data.entity.attributes.get("address1_addresstypecode").getValue();
    if (AddressTypeDBValue != null) {
        alert(AddressTypeDBValue);
    }
}
5.  Get the text value of an Option Set field:
Note: this example reads and pops the value of the Address Type (address1_addresstypecode) field on the Account form
1
2
3
4
5
6
function AlertOptionSetDisplayValue() {
   var AddressTypeDisplayValue = Xrm.Page.data.entity.attributes.get("address1_addresstypecode").getText();
    if (AddressTypeDisplayValue != null) {
        alert(AddressTypeDisplayValue);
    }
}
6.  Get the database value of a Bit field:
1
2
3
4
// example GetBitValue("telephone1");
function GetBitValue(fieldname) {
    return Xrm.Page.data.entity.attributes.get(fieldname).getValue();
}
7.  Get the value of a Date field:
returns a value like: Wed Nov 30 17:04:06 UTC+0800 2011
and reflects the users time zone set under personal options
1
2
3
4
// example GetDate("createdon");
function GetDate(fieldname) {
    return Xrm.Page.data.entity.attributes.get(fieldname).getValue();
}
8.  Get the day, month and year parts from a Date field:
1
2
3
4
5
6
7
8
9
10
11
12
13
14
15
16
// This function takes the fieldname of a date field as input and returns a DD-MM-YYYY value
// Note: the day, month and year variables are numbers
function FormatDate(fieldname) {
    var d = Xrm.Page.data.entity.attributes.get(fieldname).getValue();
    if (d != null) {
        var curr_date = d.getDate();
        var curr_month = d.getMonth();
        curr_month++;  // getMonth() considers Jan month 0, need to add 1
        var curr_year = d.getFullYear();
        return curr_date + "-" + curr_month + "-" + curr_year;
    }
    else return null;
}
 
// An example where the above function is called
alert(FormatDate("new_date2"));
9.  Set the value of a string field:
Note: this example sets the Account Name field on the Account Form to “ABC”
1
2
3
4
function SetStringField() {
    var Name = Xrm.Page.data.entity.attributes.get("name");
    Name.setValue("ABC");
}
10.  Set the value of an Option Set (pick list) field:
Note: this example sets the Address Type field on the Account Form to “Bill To”, which corresponds to a database value of “1”
1
2
3
4
function SetOptionSetField() {
    var AddressType = Xrm.Page.data.entity.attributes.get("address1_addresstypecode");
    AddressType.setValue(1);
}
11.  Set a Date field / Default a Date field to Today:
1
2
//set date field to now (works on date and date time fields)
Xrm.Page.data.entity.attributes.get("new_date1").setValue(new Date());
12.  Set a Date field to 7 days from now:
1
2
3
4
5
6
function SetDateField() {
    var today = new Date();
    var futureDate = new Date(today.setDate(today.getDate() + 7));
    Xrm.Page.data.entity.attributes.get("new_date2").setValue(futureDate);
    Xrm.Page.data.entity.attributes.get("new_date2").setSubmitMode("always"); // Save the Disabled Field
}
13.  Set the Time portion of a Date Field:
1
2
3
4
5
6
7
8
9
10
11
// This is a function you can call to set the time portion of a date field
function SetTime(attributeName, hour, minute) {
        var attribute = Xrm.Page.getAttribute(attributeName);
        if (attribute.getValue() == null) {
            attribute.setValue(new Date());
        }
        attribute.setValue(attribute.getValue().setHours(hour, minute, 0));
}
 
// Here's an example where I use the function to default the time to 8:30am
SetTime('new_date2', 8, 30);
14.  Set the value of a Lookup field:
Note: here I am providing a reusable function…
1
2
3
4
5
6
7
8
9
10
11
// Set the value of a lookup field
function SetLookupValue(fieldName, id, name, entityType) {
    if (fieldName != null) {
        var lookupValue = new Array();
        lookupValue[0] = new Object();
        lookupValue[0].id = id;
        lookupValue[0].name = name;
        lookupValue[0].entityType = entityType;
        Xrm.Page.getAttribute(fieldName).setValue(lookupValue);
    }
}
Here’s an example of how to call the function (I retrieve the details of one lookup field and then call the above function to populate another lookup field):
1
2
3
4
5
6
var ExistingCase = Xrm.Page.data.entity.attributes.get("new_existingcase");
if (ExistingCase.getValue() != null) {
    var ExistingCaseGUID = ExistingCase.getValue()[0].id;
    var ExistingCaseName = ExistingCase.getValue()[0].name;
    SetLookupValue("regardingobjectid", ExistingCaseGUID, ExistingCaseName, "incident");
}
15.  Split a Full Name into First Name and Last Name fields:
1
2
3
4
5
6
7
8
function PopulateNameFields() {
    var ContactName = Xrm.Page.data.entity.attributes.get("customerid").getValue()[0].name;
    var mySplitResult = ContactName.split(" ");
    var fName = mySplitResult[0];
    var lName = mySplitResult[1];
    Xrm.Page.data.entity.attributes.get("firstname").setValue(fName);
    Xrm.Page.data.entity.attributes.get("lastname").setValue(lName);
}
16.  Set the Requirement Level of a Field:
Note: this example sets the requirement level of the Address Type field on the Account form to Required. 
Note: setRequiredLevel(“none”) would make the field optional again.
1
2
3
4
function SetRequirementLevel() {
    var AddressType = Xrm.Page.data.entity.attributes.get("address1_addresstypecode");
    AddressType.setRequiredLevel("required");
}
17.  Disable a field:
1
2
3
4
function SetEnabledState() {
    var AddressType = Xrm.Page.ui.controls.get("address1_addresstypecode");
    AddressType.setDisabled(true);
}
18.  Force Submit the Save of a Disabled Field:
1
2
// Save the Disabled Field
Xrm.Page.data.entity.attributes.get("new_date1").setSubmitMode("always");
19.  Show/Hide a field:
1
2
3
4
function hideName() {
    var name = Xrm.Page.ui.controls.get("name");
    name.setVisible(false);
}
20.  Show/Hide a field based on a Bit field
1
2
3
4
5
6
7
8
9
function DisableExistingCustomerLookup() {
   var ExistingCustomerBit = Xrm.Page.data.entity.attributes.get("new_existingcustomer").getValue();
    if (ExistingCustomerBit == false) {
       Xrm.Page.ui.controls.get("customerid").setVisible(false);
    }
    else {
       Xrm.Page.ui.controls.get("customerid").setVisible(true);
    }
}
21.  Show/Hide a nav item:
Note: you need to refer to the nav id of the link, use F12 developer tools in IE to determine this
1
2
3
4
function hideContacts() {
    var objNavItem = Xrm.Page.ui.navigation.items.get("navContacts");
    objNavItem.setVisible(false);
}
22.  Show/Hide a Section:
Note: Here I provide a function you can use.  Below the function is a sample.
1
2
3
4
5
6
7
8
function HideShowSection(tabName, sectionName, visible) {
    try {
        Xrm.Page.ui.tabs.get(tabName).sections.get(sectionName).setVisible(visible);
    }
    catch (err) { }
}
 
HideShowSection("general", "address", false);   // "false" = invisible
23.  Show/Hide a Tab:
Note: Here I provide a function you can use. Below the function is a sample.
1
2
3
4
5
6
7
8
function HideShowTab(tabName, visible) {
    try {
        Xrm.Page.ui.tabs.get(tabName).setVisible(visible);
    }
    catch (err) { }
}
 
HideShowTab("general", false);   // "false" = invisible
24.  Save the form:
1
2
3
function SaveAndClose() {
    Xrm.Page.data.entity.save();
}
25.  Save and close the form:
1
2
3
function SaveAndClose() {
    Xrm.Page.data.entity.save("saveandclose");
}
26.  Close the form:
Note: the user will be prompted for confirmation if unsaved changes exist
1
2
3
function Close() {
    Xrm.Page.ui.close();
}
27.  Determine which fields on the form are dirty:
1
2
3
4
5
6
7
8
9
var attributes = Xrm.Page.data.entity.attributes.get()
 for (var i in attributes)
 {
    var attribute = attributes[i];
    if (attribute.getIsDirty())
    {
      alert("attribute dirty: " + attribute.getName());
    }
 }
28.  Determine the Form Type:
Note: Form type codes: Create (1), Update (2), Read Only (3), Disabled (4), Bulk Edit (6)
1
2
3
4
5
6
function AlertFormType() {
    var FormType = Xrm.Page.ui.getFormType();
     if (FormType != null) {
        alert(FormType);
    }
}
29.  Get the GUID of the current record:
1
2
3
4
5
6
function AlertGUID() {
    var GUIDvalue = Xrm.Page.data.entity.getId();
    if (GUIDvalue != null) {
        alert(GUIDvalue);
    }
}
30.  Get the GUID of the current user:
1
2
3
4
5
6
function AlertGUIDofCurrentUser() {
    var UserGUID = Xrm.Page.context.getUserId();
     if (UserGUID != null) {
        alert(UserGUID);
    }
}
31.  Get the Security Roles of the current user:
(returns an array of GUIDs, note: my example reveals the first value in the array only)
1
2
3
function AlertRoles() {
    alert(Xrm.Page.context.getUserRoles());
}
32.  Determine the CRM server URL:
1
2
3
4
5
6
7
// Get the CRM URL
var serverUrl = Xrm.Page.context.getServerUrl();
 
// Cater for URL differences between on premise and online
if (serverUrl.match(/\/$/)) {
    serverUrl = serverUrl.substring(0, serverUrl.length - 1);
}
33.  Refresh a Sub-Grid:
1
2
var targetgird = Xrm.Page.ui.controls.get("target_grid");
targetgird.refresh();
34.  Change the default entity in the lookup window of a Customer or Regarding field:
Note: I am setting the customerid field’s lookup window to offer Contacts (entityid 2) by default (rather than Accounts). I have also hardcoded the GUID of the default view I wish displayed in the lookup window.
1
2
3
4
5
function ChangeLookup() {
    document.getElementById("customerid").setAttribute("defaulttype", "2");
    var ViewGUID= "A2D479C5-53E3-4C69-ADDD-802327E67A0D";
    Xrm.Page.getControl("customerid").setDefaultView(ViewGUID);
}
35.  Pop an existing CRM record (new approach):
1
2
3
4
5
6
7
8
function PopContact() {
    //get PrimaryContact GUID
    var primaryContactGUID = Xrm.Page.data.entity.attributes.get("primarycontactid").getValue()[0].id;
    if (primaryContactGUID != null) {
        //open Contact form
        Xrm.Utility.openEntityForm("contact", primaryContactGUID)
    }
}
36.  Pop an existing CRM record (old approach):
Note: this example pops an existing Case record.  The GUID of the record has already been established and is stored in the variable IncidentId.
01
02
03
04
05
06
07
08
09
10
11
12
//Set features for how the window will appear
var features = "location=no,menubar=no,status=no,toolbar=no";
 
// Get the CRM URL
var serverUrl = Xrm.Page.context.getServerUrl();
 
// Cater for URL differences between on premise and online
if (serverUrl.match(/\/$/)) {
    serverUrl = serverUrl.substring(0, serverUrl.length - 1);
}
 
window.open(serverUrl + "/main.aspx?etn=incident&pagetype=entityrecord&id=" + encodeURIComponent(IncidentId), "_blank", features, false);
37.  Pop a blank CRM form (new approach):
1
2
3
function PopNewCase() {
    Xrm.Utility.openEntityForm("incident")
}
38.  Pop a new CRM record with default values (new approach):
1
2
3
4
5
6
7
8
9
10
11
12
13
14
function CreateIncident() {
    //get Account GUID and Name
    var AccountGUID = Xrm.Page.data.entity.getId();
    var AccountName = Xrm.Page.data.entity.attributes.get("name").getValue();
    //define default values for new Incident record
    var parameters = {};
    parameters["title"] = "New customer support request";
    parameters["casetypecode"] = "3";
    parameters["customerid"] = AccountGUID;
    parameters["customeridname"] = AccountName;
    parameters["customeridtype"] = "account";
    //pop incident form with default values
    Xrm.Utility.openEntityForm("incident", null, parameters);
}
39.  Pop a new CRM record with default values (old approach):
Note: this example pops the Case form from the Phone Call form, defaulting the Case’s CustomerID based on the Phone Call’s SenderID and defaulting the Case Title to “New Case”
1
2
3
4
5
6
7
8
9
10
11
12
13
14
15
16
17
18
19
20
21
22
23
//Collect values from the existing CRM form that you want to default onto the new record
var CallerGUID = Xrm.Page.data.entity.attributes.get("from").getValue()[0].id;
var CallerName = Xrm.Page.data.entity.attributes.get("from").getValue()[0].name;
 
//Set the parameter values
var extraqs = "&title=New Case";
extraqs += "&customerid=" + CallerGUID;
extraqs += "&customeridname=" + CallerName;
extraqs += "&customeridtype=contact";
 
//Set features for how the window will appear
var features = "location=no,menubar=no,status=no,toolbar=no";
 
// Get the CRM URL
var serverUrl = Xrm.Page.context.getServerUrl();
 
// Cater for URL differences between on premise and online
if (serverUrl.match(/\/$/)) {
    serverUrl = serverUrl.substring(0, serverUrl.length - 1);
}
 
//Pop the window
window.open(serverUrl + "/main.aspx?etn=incident&pagetype=entityrecord&extraqs=" + encodeURIComponent(extraqs), "_blank", features, false);
40.  Pop a Dialog from a ribbon button
Note: this example has the Dialog GUID and CRM Server URL hardcoded, which you should avoid.  A simple function is included which centres the Dialog when launched.
01
02
03
04
05
06
07
08
09
10
11
12
13
function LaunchDialog(sLeadID) {
    var DialogGUID = "128CEEDC-2763-4FA9-AB89-35BBB7D5517D";
    serverUrl = serverUrl + "cs/dialog/rundialog.aspx?DialogId=" + "{" + DialogGUID + "}" + "&EntityName=lead&ObjectId=" + sLeadID;
    PopupCenter(serverUrl, "mywindow", 400, 400);
    window.location.reload(true);
}
 
function PopupCenter(pageURL, title, w, h) {
    var left = (screen.width / 2) - (w / 2);
    var top = (screen.height / 2) - (h / 2);
    var targetWin = window.showModalDialog(pageURL, title, 'toolbar=no, location=no, directories=no, status=no, menubar=no, scrollbars=no, resizable=no, copyhistory=no, width=' + w + ', height=' + h + ', top=' + top + ', left=' + left);
}
41.  Pop a URL from a ribbon button
Great info on the window parameters you can set here:  http://javascript-array.com/scripts/window_open/
01
02
03
04
05
06
07
08
09
10
11
12
13
14
15
16
17
18
19
20
21
22
23
function LaunchSite() {
    // read URL from CRM field
    var SiteURL = Xrm.Page.data.entity.attributes.get("new_sharepointurl").getValue();
    // execute function to launch the URL
    LaunchFullScreen(SiteURL);
}
 
function LaunchFullScreen(url) {
 // set the window parameters
 params  = 'width='+screen.width;
 params += ', height='+screen.height;
 params += ', top=0, left=0';
 params += ', fullscreen=yes';
 params += ', resizable=yes';
 params += ', scrollbars=yes';
 params += ', location=yes';
 
 newwin=window.open(url,'windowname4', params);
 if (window.focus) {
     newwin.focus()
 }
 return false;
}
42.  Pop the lookup window associated to a Lookup field:
1
window.document.getElementById('new_existingcase').click();
43.  Pop a Web Resource (new approach):
1
2
3
function PopWebResource() {
    Xrm.Utility.openWebResource("new_Hello");
}
44. Using a SWITCH statement
1
2
3
4
5
6
7
8
9
10
11
12
13
14
15
16
17
18
19
20
21
22
23
24
function GetFormType() {
    var FormType = Xrm.Page.ui.getFormType();
    if (FormType != null) {
        switch (FormType) {
            case 1:
                return "create";
                break;
            case 2:
                return "update";
                break;
            case 3:
                return "readonly";
                break;
            case 4:
                return "disabled";
                break;
            case 6:
                return "bulkedit";
                break;
            default:
                return null;
        }
    }
}
45.  Pop an Ok/Cancel Dialog
1
2
3
4
5
6
7
8
9
10
11
12
13
function SetApproval() {
    if (confirm("Are you sure?")) {
        // Actions to perform when 'Ok' is selected:
        var Approval = Xrm.Page.data.entity.attributes.get("new_phaseapproval");
        Approval.setValue(1);
        alert("Approval has been granted - click Ok to update CRM");
        Xrm.Page.data.entity.save();
    }
    else {
        // Actions to perform when 'Cancel' is selected:
        alert("Action cancelled");
    }
}
46.  Retrieve a GUID via REST (default the Price List field)
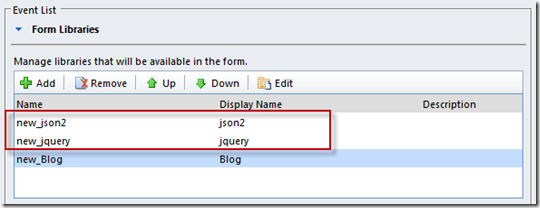
In this example (intended for the Opportunity form’s Onload event) I execute a REST query to retrieve the GUID of the Price List named “Wholesale Price List”.  I then execute the DefaultPriceList function to default the Price List field.  As this uses REST your CRM form will need json2 and jquery libraries registered on the CRM form (I have these libraries in a solution file I import when needed):
image
1
2
3
4
5
6
7
8
9
10
11
12
13
14
15
16
17
18
19
20
21
22
23
24
25
26
27
28
29
30
31
32
33
34
35
36
37
38
39
40
41
42
43
44
function RetrieveGUID() {
    // Get CRM Context
    var context = Xrm.Page.context;
    var serverUrl = context.getServerUrl();
    // Cater for URL differences between on-premise and online
    if (serverUrl.match(/\/$/)) {
        serverUrl = serverUrl.substring(0, serverUrl.length - 1);
    }
    // Define ODATA query
    var ODATA_ENDPOINT = "/XRMServices/2011/OrganizationData.svc";
    var ODATA_EntityCollection = "/PriceLevelSet";
    var PriceListName = 'Wholesale Price List';
    var QUERY = "?$select=PriceLevelId&$filter=Name%20eq%20'" + PriceListName + "'&$top=1";
    var URL = serverUrl + ODATA_ENDPOINT + ODATA_EntityCollection + QUERY;
    //Asynchronous AJAX call
    $.ajax({
        type: "GET",
        contentType: "application/json; charset=utf-8",
        datatype: "json",
        url: URL,
        beforeSend: function (XMLHttpRequest) {
            //Specifying this header ensures that the results will be returned as JSON.
            XMLHttpRequest.setRequestHeader("Accept", "application/json");
        },
        success: function (data, textStatus, XmlHttpRequest) {
            //This function will trigger asynchronously if the Retrieve was successful
            var GUID_Retrieved = data.d.results[0].PriceLevelId;
            DefaultPriceList(GUID_Retrieved, PriceListName);
        },
        error: function (XmlHttpRequest, textStatus, errorThrown) {
            //This function will trigger asynchronously if the Retrieve returned an error
            alert("ajax call failed");
        }
    });
}
 
function DefaultPriceList(GUID, NAME){
        var lookupValue = new Array();
        lookupValue[0] = new Object();
        lookupValue[0].id = GUID;
        lookupValue[0].name = NAME;
        lookupValue[0].entityType = "pricelevel";
        Xrm.Page.getAttribute("pricelevelid").setValue(lookupValue);
}

Here is a little more info that will help you get your head around the general design of all this…
Depending upon what you want to do you will interact with one of the following:
Xrm.Page.data.entity.attributes – The data fields represented by fields on the form
Xrm.Page.ui.controls – The user interface controls on the form
Xrm.Page.ui.navigation.items – The navigation items on the form
Xrm.Utility – A container of helpful functions
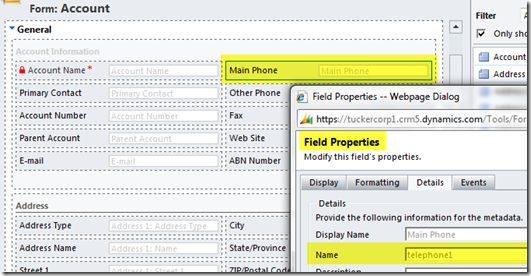
When referring to fields or controls you must specify the name of the field and surround with quotes (and make sure you get the case right):
image
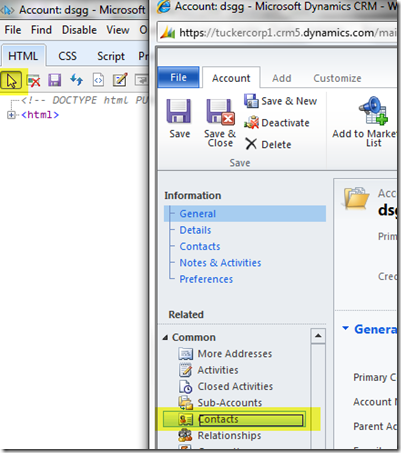
When referring to nav items you must specify the nav ID and surround it with quotes.  To determine the nav ID:
– open the CRM form in IE
– hit F12 to activate IE’s developer tools (if it doesn’t appear, check for it under Task Manager and maximise it from there)
– in the developer tools window click the arrow to activate the “Select element by click” mode
– on the CRM form click the nav item (the dev tools window will take you to HTML definition of that element)
image
– just above there you will see the nav ID specified, look for id=”nav<something>”
image
When setting properties to true/false do not surround the true/false value with quotes.
Typically there are 2 steps to interacting with fields.  First you get the field as an object.  Then you interact with that object to get or set the property value you are interested in.


Hide/Show Field

1
2
3
4
5
6
function HideShowField(fieldName, show) {
    var field = Xrm.Page.ui.controls.get(fieldName);
 
    if (field != null)
        field.setVisible(show);
}


Hide/Show Field but removing white space
1
2
3
4
5
6
7
function HideShowFieldRemoveSpace(fieldname, show) {
    var displayStyle = show ? 'block' : 'none';
    if (document.getElementById(fieldname + '_c') != null && document.getElementById(fieldname + '_d') != null) {
        document.getElementById(fieldname + '_c').style.display = displayStyle;
        document.getElementById(fieldname + '_d').style.display = displayStyle;
    }
}


Disable/Not Disable Field

1
2
3
4
5
6
function SetDisableField(fieldName, disabled) {
    var field = Xrm.Page.getControl(fieldName);
 
    if (field != null)
        field.setDisabled(disabled);
}


Set Requirement Level

1
2
3
4
5
6
function SetRequirementLevel(fieldName, reqLevel) {
    var field = Xrm.Page.getAttribute(fieldName);
 
    if (field != null)
        field.setRequiredLevel(reqLevel);
}


Set Required Level

1
2
3
4
5
6
function SetRequirementLevel(fieldName, reqLevel) {
    var field = Xrm.Page.getAttribute(fieldName);
 
    if (field != null)
        field.setRequiredLevel(reqLevel);
}


Validate Number Field and Character Limit

1
2
3
4
5
6
7
8
9
10
function validateNumberField(context, limit) {
    var value = context.getEventSource().getValue();
    var fieldName = context.getEventSource().getName();
    var labelName = Xrm.Page.ui.controls.get(fieldName).getLabel();
    var valueRegex = new RegExp("^\\d{" + limit + "}$");
    if (!value.match(valueRegex)) {
        event.returnValue = false;
        alert("The format of the " + labelName + " is incorrect");
    }
}


Validate Future DateTime

1
2
3
4
5
6
7
8
9
function ValidateFutureDate(fieldname) {
    var today = new Date();
    var dueDate = Xrm.Page.getAttribute(fieldname).getValue();
 
    if (dueDate != null && dueDate < today) {
        alert("Date value needs to be in the future");
        Xrm.Page.getAttribute(fieldname).setValue(today);
    }
}


Example function to hide left navigation item based on a condition

1
2
3
4
5
6
7
8
9
10
11
12
function ShowBankDetails() {
    var payeeRole = "new_rolepayee";
    var payeeChkBox = Xrm.Page.ui.controls.get(payeeRole);
    var payeeChkBoxValue = payeeChkBox.getAttribute().getValue();
 
    if (payeeChkBoxValue == true) {
        Xrm.Page.ui.navigation.items.get("nav_new_account_new_bankdetail").setVisible(true);
    }
    else {
        Xrm.Page.ui.navigation.items.get("nav_new_account_new_bankdetail").setVisible(false);
    }
}


Avoiding the checkbox OnChange bug so that it fires off immediately (put this in OnLoad event of the form)

1
2
3
function TriggerCheckBoxClick() {
    crmForm.all.new_checkbox.onclick = function () { crmForm.all.new_checkbox.FireOnChange(); };
    }


Set Lookup Value

1
2
3
4
5
6
7
8
9
10
11
function SetLookupValue(fieldName, id, name, entityType) {
    if (fieldName != null) {
        var lookupValue = new Array();
        lookupValue[0] = new Object();
        lookupValue[0].id = id;
        lookupValue[0].name = name;
        lookupValue[0].entityType = entityType;
 
        Xrm.Page.getAttribute(fieldName).setValue(lookupValue);
    }
}
Hide Picklist Item Text

1
2
3
4
5
6
7
8
9
10
11
function HidePicklistItemWithText(fieldName, withText) {
    var picklist = document.getElementById(fieldName);
 
    for (var i = picklist.options.length - 1; i >= 0; i--) {
        var picklistItemText = picklist.options[i].text;
 
        if (picklistItemText.match(withText) == withText && picklist.selectedIndex != i) {
            picklist.options.remove(i);
        }
    }
}